Fitting the abrasive tools
- Pull the plug out of the socket before carrying out any work on the power tool.
- Do not touch grinding and cutting discs until they have cooled down. The discs can become very hot while working.
Clean the grinding spindle (19) and all the parts to be fitted.
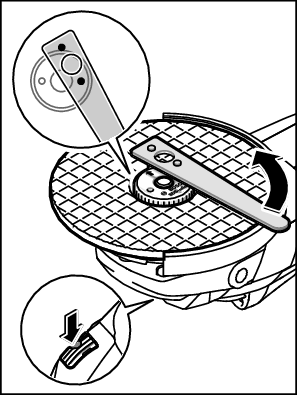
Lock the grinding spindle with the spindle lock button (1) before clamping and releasing the abrasive tools.
- Do not press the spindle lock button while the grinding spindle is moving. The power tool may become damaged if you do this.
Grinding/cutting disc
Pay attention to the dimensions of the abrasive tools. The diameter of the hole must match that of the mounting flange. Do not use an adapter or reducer.
When using diamond cutting discs, ensure that the arrow indicating the direction of rotation on the diamond cutting disc matches the direction of rotation of the power tool (see the direction of rotation arrow on the machine head).
See the graphics page for fitting instructions.
Note: When assembling bonded grinding or cutting discs using the supplied mounting flange (10) and the clamping nut (14) or quick-clamping nut (15), the use of intermediate layers is not necessary.
To secure the grinding/cutting disc, place the mounting flange with O-ring (10) on the grinding spindle (19) and screw on the clamping nut (14). Ensure the alignment of the clamping nut (14) depending on the grinding/cutting disc used (see figures in the front part of the operating manual), and tighten them with the two-pin spanner see
Quick-clamping nut  .
.
- After fitting the abrasive tool, check that the abrasive tool is fitted correctly and can turn freely before switching on the power tool. Make sure that the abrasive tool does not brush against the protective guard or other parts.
A plastic part (O-ring) is fitted around the centring collar in the mounting flange (10). If the O-ring is missing or damaged, the mounting flange (10) must be replaced before operation can resume.
Quick-clamping nut
To change the abrasive tool easily without having to use any additional tools, you can use the quick-clamping nut (15) instead of the clamping nut (14).
- The quick-clamping nut (15) may be used only for grinding or cutting discs.
Only use quick-clamping nuts (15) that are in good working order and not damaged.
When screwing on, make sure that the printed side of the quick-clamping nut (15) is not facing the grinding disc; the arrow must be pointing towards the index mark (38).
Press the spindle lock button (1) to lock the grinding spindle. To tighten the quick-clamping nut, turn the grinding disc firmly clockwise.
If the quick-clamping nut has been attached correctly and is not damaged, you can loosen it by hand by turning the knurled ring anticlockwise. If the quick-clamping nut is stuck, do not attempt to loosen it with pliers – always use the two-pin spanner. Position the two‑pin spanner as shown in the figure.