Working Advice
- Before carrying out any work on the power tool (e.g. maintenance, tool change etc.), remove the battery from the power tool. There is risk of injury from unintentionally pressing the on/off switch.
Before starting work, always check that the safety and actuation devices are functioning correctly and that all screws and nuts are tightly seated.
If a power tool is defective or not functioning properly, disconnect it immediately from the power supply and contact an authorised Bosch after-sales service centre.
Do not perform any incorrect manipulations on the power tool. Do not disassemble or block any components of the power tool. Do not carry out "emergency repairs" with unsuitable means.
Avoid any tampering and damage to the power tool, e. g. from:
- Imprinting or engraving,
- Retrofitting measures not approved by the manufacturer,
- Dropping on or sliding over the floor,
- Using as a hammer,
- Applying any kind of force.
For longer work breaks and after finishing work, switch off the power tool, remove the battery and empty the magazine if possible.
When fastening, observe the manufacturer's specifications for the material being fastened, as well as the construction plans for the systems.
Make sure to check whatever is below or behind your workpiece. Do not insert nails into walls, ceilings or floors when persons are behind them. The nails may punch through the substrate and may cause injury.
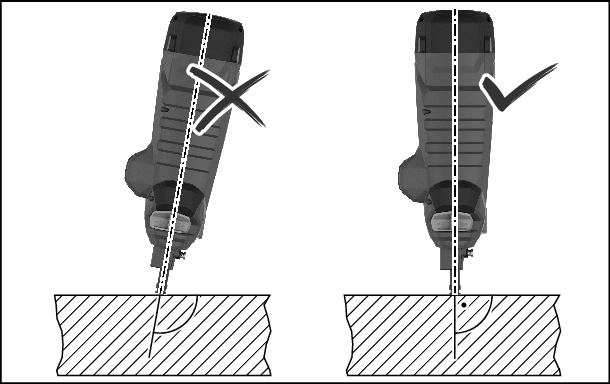
The nails must always be discharged into the substrate at a perpendicular angle.
Do not insert a nail on top of one that has already been inserted. This could cause the nail to deform, the nails could become jammed or the power tool could move in an uncontrolled manner.
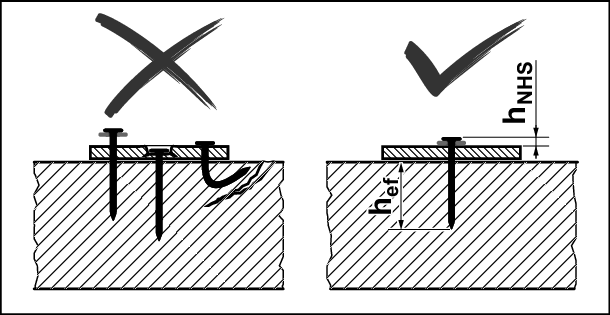
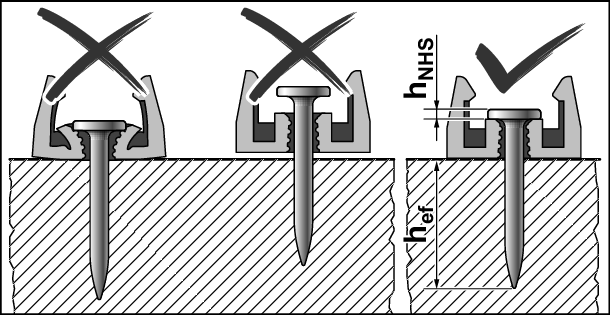
Check whether the nails have been inserted correctly. For fastening to be secure, they must sit neither too high nor too low nor be bent.
GNB 18V‑40: When attaching fastening elements, also check that the nails have been set correctly.
If concrete is damaged by failed nails, it must be repaired in accordance with recognised rules.
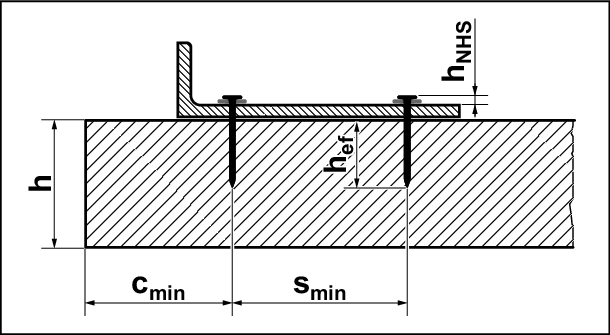
Please find the following information in the documentation of Bosch nails at
http://www.bosch-pt.com:
- Nail head distance hNHS
- Effective embedment length hef
- Minimum thickness of concrete element h
- Minimum distance between two nails smin
- Minimum edge distance cmin
- Recommended loads
You can use the power tool to attach individual plastic or steel fastening elements to the substrate.
Examples of fastening elements:
Order number | Description | |
|---|---|---|
| 1 600 A03 2G6 | Pipe clamp 16 mm |
1 600 A03 2G7 | Pipe clamp 20 mm | |
1 600 A03 2G8 | Pipe clamp 25 mm | |
1 600 A03 2G9 | Pipe clamp 32 mm | |
1 600 A03 2GA | Pipe clamp 40 mm | |
| 1 600 A03 2GB | Cable bracket (one-sided) for 8 cables |
| 1 600 A03 2GC | Cable bracket (double-sided) for 16 cables |
| 1 600 A03 2GD | Cable holder for 20 cables |
1 600 A03 2GE | Cable holder for 40 cables | |
| 1 600 A03 2GF | Cable tie holder |
| 1 600 A03 2GG | Cable ties 8−32 mm |
1 600 A03 2GH | Cable ties 16−63 mm |


You can find the complete range of Bosch-fastening elements at www.bosch-pt.com.
- Only use fastening elements that are recommended for your power tool by Bosch. The use of unauthorised fastening elements can damage the power tool and cause injury.
For plastic fastening elements, use the narrow contact element (23) (see figure E).
For steel fastening elements, use the standard contact element (17) (see figure F). Slide the magnet ring (24) sideways over the tip of the contact element so that it clicks into place.
Place a fastening element with the intended nail hole on the contact element (23) or the magnet ring (24).
- Only ever fit a single fastening element. Several elements on top of each other can lead to injuries or damage.
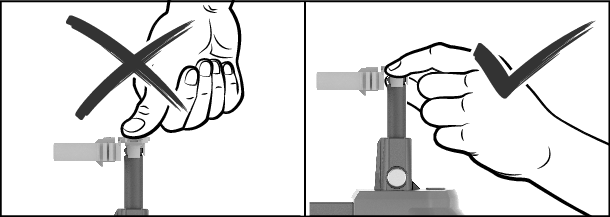
- Always keep your hands to the side of the outlet when fitting the fastening element. Always point the outlet away from yourself or other persons. Do not press the contact element inwards. Keep your fingers away from the trigger. Unexpected triggering can cause a nail to be released, which can lead to injuries or damage to the power tool.
Press the contact element with the fastening element in place onto the substrate. Trigger the discharging procedure as usual.
Set the fastening depth using the depth stop switch (20) so that the correct value for the nail head distance hNHS is achieved.

Nail too deep: Press the depth stop switch (20) to the right.
If the nails are driven in too deep, use longer nails.

Nail not deep enough: Press the depth stop switch (20) to the left.
If the nails are not driven in deep enough, use shorter nails.
Clear jams if the status display (2) lights up red or orange, or if the nails are no longer discharged correctly.
- Remove the rechargeable battery (10). Empty the magazine (12) and remove it. Remove the contact element (17).
- Check the magazine (12) and clear away dirt, residue and foreign objects.
- Check the contact element (17) and clear away nails, nail fragments, residue or foreign objects with the punch pin (21). When doing so, ensure that you do not damage the contact element.
- In sequence, re-insert the contact element (17), magazine (12) and battery (10).
- Press the button (15) on the magazine slider (14) and slide it towards the magazine opening until it engages.
- Switch on the power tool.
- Press the Reset button (4) for 5 seconds until the status indicator (2) starts to flash.
- Press the contact element (17) against a wooden block or similar and press the trigger (6). By doing this, the motor can bring the firing pin into the correct position.
- If another fault is detected, the power tool does not return to normal operation. Instead, the other fault appears in the status display (2).
You can use the utility hook (25) to attach the switched-off power tool to a suitable suspension device.
Using the screw supplied, screw the utility hook (25) to the housing of the power tool (see figure G).
- Check the utility hook (25) for damage or deformation.
Do not use the utility hook (25) if it is damaged, deformed or no longer firmly secured to the power tool. - Use the utility hook (25) to attach the power tool to a suspension device.
To avoid damage or injury, the suspension device must not be attached above walkways or immediate work areas.
The utility hook is intended solely for the purpose of hanging the power tool, including fitted accessories.
- Never use the utility hook as a fall protection system.